A complete, no-fluff guide — from frustrated sysadmin to Proxmox freedom
1. The Email Nobody Wanted to Open
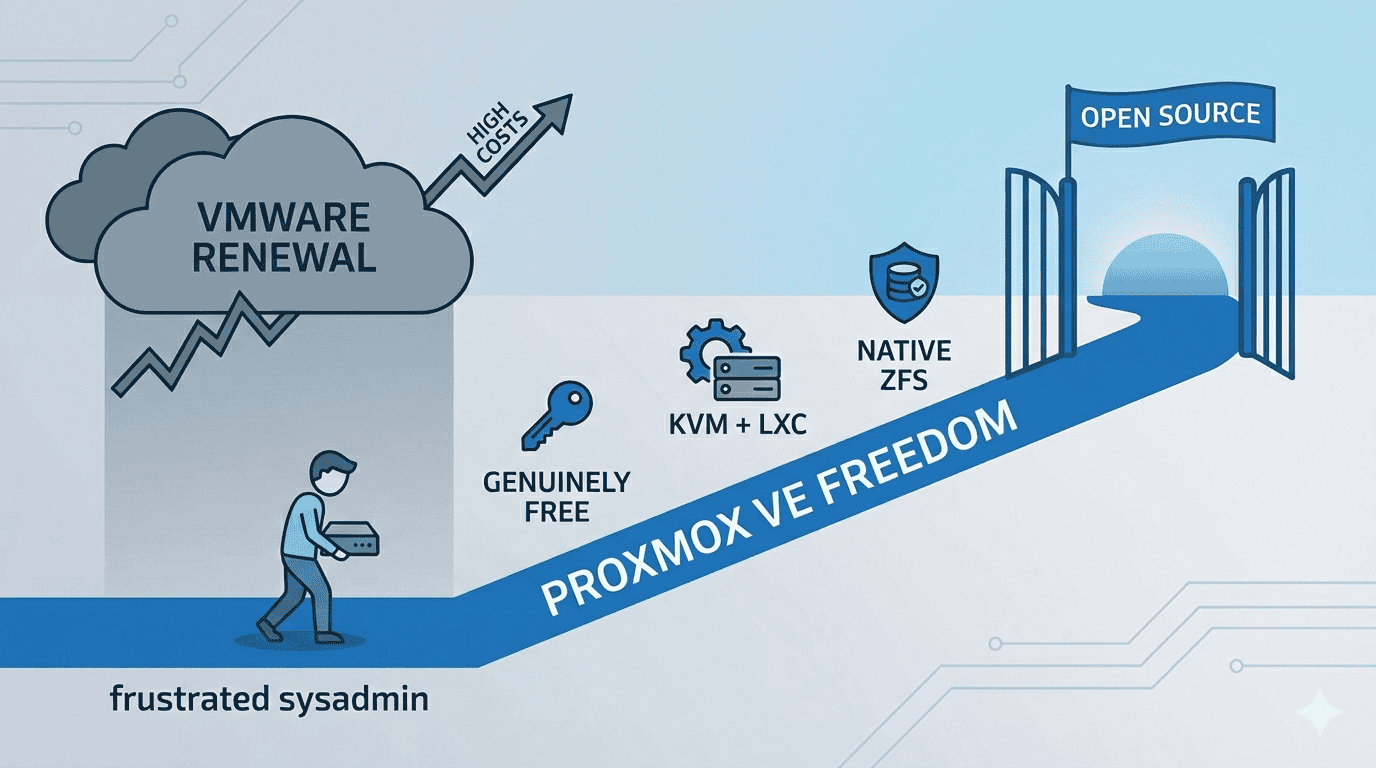
Picture this: It’s a regular Tuesday morning. You pour your coffee, open your inbox, and there it is — the VMware renewal notice. You click it. You scroll down. You blink. You scroll back up. You think maybe you misread the number.
You didn’t.
What used to cost you a few hundred dollars a year — or a one-time fee that you paid and forgot about — now has a comma in it. Or two. And buried in the fine print is a new policy: 72-core minimum, subscription only, perpetual licenses discontinued, effective immediately.
If you’ve been living this nightmare, you’re not alone. Broadcom’s acquisition of VMware in late 2023 triggered one of the most aggressive enterprise software pricing overhauls in recent memory. The community is furious. The forums are on fire. And hundreds of thousands of sysadmins, homelabbers, and SMB owners are asking the same question:
“How fast can I get off VMware?”
This guide answers that question — completely, honestly, and with working commands you can run today. By the end of it, you’ll have a clear migration path from VMware ESXi to Proxmox VE, and you’ll wonder why you didn’t make the switch sooner.
2. What Broadcom Actually Did (And Why It Hurts So Much)
Let’s be precise, because the details matter when you’re trying to explain this to a manager or a client who still thinks VMware is “the safe choice.”
2.1 Perpetual Licenses Are Gone
Broadcom eliminated all perpetual VMware licenses. If you bought ESXi outright in 2020 and planned to run it forever — that option no longer exists for new purchases or renewals. Everything is now a subscription, billed annually, with no grandfathering for long-term customers.
2.2 Product Bundles Collapsed from 168 to 4
VMware used to sell dozens of individual products and bundles. You could buy exactly what you needed. Now there are four SKUs: VMware Cloud Foundation (VCF), VMware vSphere Foundation (VVF), VMware vSphere Standard (VVS), and VMware vSphere Essential Plus (VVEP). Most of the functionality you might actually want — like HA clustering or advanced storage — is locked in VCF, which is the most expensive tier.
2.3 Per-Core Pricing With a 72-Core Minimum
This is the one that breaks small shops. VMware now bills per physical CPU core across all your ESXi hosts. The minimum order? 72 cores. Running a two-node homelab with modern 8-core CPUs? You’re paying for 72 cores you don’t have. Some businesses report renewal cost increases of 350% to over 1,000%.
2.4 Miss Your Renewal Date? That’ll Cost Extra
There’s now a 20% penalty applied retroactively from your missed renewal date if you don’t renew on time. It’s the kind of clause that turns an oversight into a budget emergency.
The result? A massive, industry-wide search for alternatives. And the top destination people keep landing on is Proxmox VE.
VMware vs. Proxmox VE — Full Feature & Cost Comparison
| Feature | VMware (Old) | VMware (Broadcom 2026) | Proxmox VE |
| License Type | Perpetual | Subscription only | Open Source / Free |
| Pricing Model | Per-socket | Per-core (72-core min) | $0 Community |
| Min Annual Cost (2-node lab) | ~$500 once | ~$25,200/year | $0 |
| Hypervisor | ESXi | ESXi | KVM + LXC |
| Container Support | None | None | Built-in (LXC) |
| ZFS Storage | No | No | Native |
| Web UI | Yes (vSphere) | Yes (VCF) | Yes (Built-in) |
| API / Automation | Limited | Limited | Full REST API |
| Community Support | Good | Degraded | Excellent |
Minimum cost scenario: 2-node lab, modern CPUs, VMware Enterprise Plus annual subscription.
3. Why Proxmox VE — And Not Something Else?
Fair question. There are other VMware alternatives: XCP-ng, Microsoft Hyper-V, oVirt, even bare-metal Docker with Portainer. Here’s why Proxmox consistently wins the migration conversation:
- It’s genuinely free. Proxmox VE Community Edition costs nothing. Zero. You can run a 10-node cluster in production on the free version. The optional enterprise subscription (for tested stable repos and support) starts at around €110/year per node — that’s a rounding error compared to VMware.
- KVM + LXC in one platform. Proxmox combines full virtual machines (KVM) and lightweight containers (LXC) under one roof. You can run your Windows Server VM right next to a containerized Linux app, managed from the same interface.
- ZFS support is built in. ZFS gives you snapshots, data integrity checksums, compression, and RAID-like redundancy — all without buying additional storage software.
- The web UI is excellent. No client software needed. Proxmox’s browser-based UI is clean, fast, and comprehensive. You can do almost everything without ever touching the CLI.
- API-first, automation-friendly. Proxmox has a full REST API and works natively with Ansible, Terraform, and Python scripts. It’s a DevOps-friendly platform.
- Active, helpful community. The Proxmox forums are one of the most useful communities in self-hosted infrastructure. Problems get answered quickly by people who’ve actually hit the same issues.
I’ve been running Proxmox in my own homelab for a while now, and the thing that surprises most people I talk to is how production-ready it actually is. This isn’t a hobbyist toy. It’s what many ISPs, VPS providers, and enterprise teams quietly run in their data centers.
4. Before You Touch Anything: The Pre-Migration Checklist
The difference between a smooth migration and a painful one is almost always preparation. Don’t skip this section just because you’re eager to get started.
4.1 Inventory Your VMs
Go through every virtual machine on your ESXi host and document:
- OS and version (Windows Server 2019, Ubuntu 22.04, etc.)
- vCPUs and RAM allocation
- Disk size and type (thin provisioned vs. thick)
- Network configuration (VLANs, static IPs, multiple NICs)
- Any VMware-specific features: vSAN, Fault Tolerance, vMotion dependencies
- Applications running inside — anything with licensing tied to hardware IDs will need reactivation
4.2 Know Your Limitations Before You Start
Proxmox’s import tool is excellent, but it has known limitations worth flagging now:
⚠️ VMs stored on vSAN cannot be imported directly. You must Storage vMotion them to a regular VMFS datastore first.
⚠️ Encrypted VM disks (VMware storage policy encryption) cannot be imported. Remove the encryption policy in vSphere before proceeding.
⚠️ VMs with many snapshots will import very slowly. Delete all snapshots in ESXi before exporting — snapshot chains multiply the transfer size dramatically.
4.3 Back Up Everything
This sounds obvious. Do it anyway. Use Veeam, Unitrends, or even a manual OVF export to an external drive. Never migrate a live production VM without a current, tested backup. Migrations occasionally go sideways, and having a backup turns a disaster into a minor inconvenience.
4.4 Verify Your Proxmox VE Version
Make sure you’re running Proxmox VE 7.x or newer (8.x recommended). The ESXi import wizard was significantly improved in recent versions. Check your version from the Proxmox shell:
pveversion💡 If you haven’t installed Proxmox yet, download the latest ISO from proxmox.com and do a clean install. The setup wizard is straightforward and takes about 15 minutes. Visit our post for more information: Installing Proxmox VE
5. Migration Method 1 — The GUI Import Wizard (Recommended)
Proxmox added a native ESXi import feature that dramatically simplifies the migration process. If you’re on the same network as your ESXi host, this is the path you want.
Step 1: Enable SSH on Your ESXi Host
Proxmox needs SSH access to your ESXi host to read and transfer VM data.
Via the ESXi web UI: Host → Manage → Services → TSM-SSH → Start
Via vCenter: Select the host → Configure → Services → SSH → Start
Step 2: Add ESXi as a Storage Source in Proxmox
In the Proxmox web UI, go to:
Datacenter → Storage → Add → ESXi
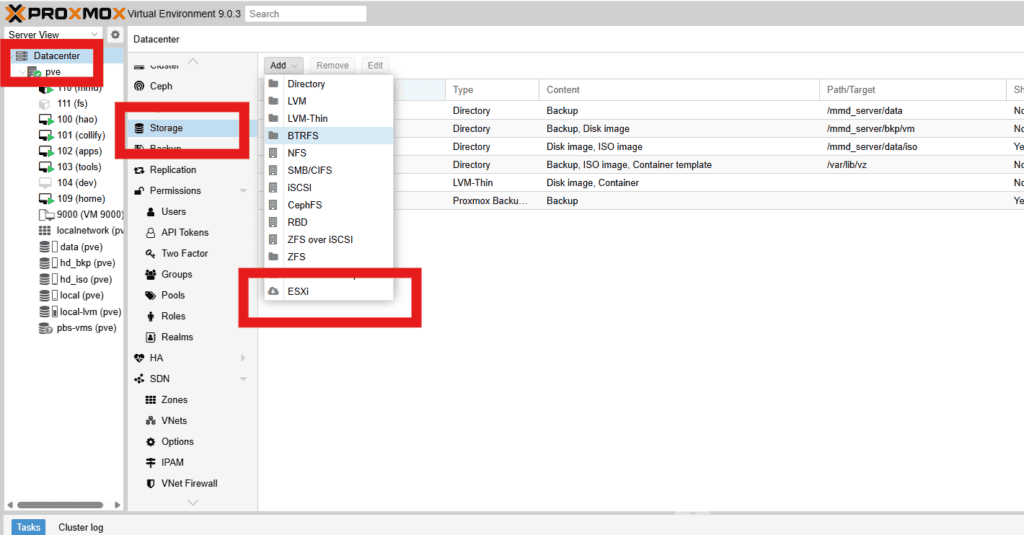
Fill in:
- Server: IP address of your ESXi host
- Username: root (or a user with full admin rights)
- Password: ESXi root password
- Skip Certificate Verification: Check this box — self-signed certs are standard in non-enterprise setups
Step 3: Import Your VMs
After adding the storage source, navigate to it in the Proxmox sidebar. You’ll see all VMs on that ESXi host listed. Click a VM and select Import.
The wizard will ask you to:
- Choose the target node (which Proxmox host to import to)
- Choose the storage destination (local-lvm, local-zfs, NFS share, etc.)
- Set VM ID and network bridge
💡 Import one VM at a time. Running parallel imports is possible but it puts heavy strain on the FUSE filesystem used during transfer. Be patient — this is a one-time process.
Step 4: Start the Import and Monitor Progress
Click Import and watch the task log. Depending on VM disk size and network speed, this can take anywhere from a few minutes to a couple of hours. A 100GB thin-provisioned VM on a gigabit network typically imports in 20–40 minutes.
6. Migration Method 2 — Manual CLI (OVF/VMDK)
Sometimes the GUI wizard won’t work — maybe your ESXi version is too old, or there’s a network barrier, or you just prefer the control of doing it manually. This method uses OVF export and the qemu-img tool to convert and import disks.
Step 1: Export the VM from VMware
In vSphere Client: right-click the VM → Export OVF Template. Choose OVA (single .ova file) for simplicity, or OVF folder if you want separate components.
Make sure the VM is powered off before exporting for a clean, consistent image.
Step 2: Transfer the File to Your Proxmox Server
# From your local machine or a jump host:

scp /path/to/exported.ova root@proxmox-ip:/var/vm-imports/
Step 3: Convert the VMDK Disk to qcow2
# Extract the OVA if needed:

tar xvf exported.ova -C /var/vm-imports/

# Convert the VMDK to qcow2 format:

qemu-img convert -f vmdk /var/vm-imports/vm-disk.vmdk \

-O qcow2 /var/vm-imports/vm-disk.qcow2
This step can take a while for large disks. The resulting qcow2 file is what Proxmox natively uses.
Step 4: Create a VM Shell and Import the Disk
# Create a new empty VM (replace 100 with your desired VM ID):

qm create 100 --name "migrated-vm" \

--memory 4096 --sockets 1 --cores 4 \

--machine q35 --bios ovmf \

--net0 virtio,bridge=vmbr0

# Import the disk into the VM:

qm importdisk 100 /var/vm-imports/vm-disk.qcow2 local-zfs

# Attach the imported disk to the VM:

qm set 100 --scsi0 local-zfs:vm-100-disk-0

# Set boot order:

qm set 100 --boot order=scsi0
Step 5: Boot and Test
Start the VM from the Proxmox UI (or with qm start 100) and open the console. If it boots successfully, congratulations — you’re 80% done. The remaining 20% is post-migration cleanup.
7. After the Import: Making Your VM Actually Fast
Most migration guides stop at “it booted.” This section is where the real optimization happens. A VM that imported successfully is not the same as a VM running at full performance. Here’s what you need to do.
7.1 Switch Network Driver to VirtIO
VMware uses vmxnet3 or e1000 drivers. Proxmox’s KVM hypervisor performs significantly better with the VirtIO paravirtualized driver. To change it:
Proxmox UI: Select VM → Hardware → Network Device → Edit → Model: VirtIO (paravirtualized)
For Linux VMs this change is seamless. The OS will auto-detect the new driver on reboot. For Windows VMs, you’ll need the VirtIO drivers installed first (see below).
7.2 Fix Windows VMs: Prevent the Blue Screen of Death
If your Windows VM blue screens immediately after booting in Proxmox, it’s almost certainly missing the VirtIO storage driver. Here’s the fix:
Temporary fix: In VM Hardware, change the disk bus from SCSI (VirtIO) to SATA or IDE. The VM will boot successfully because Windows already has IDE/SATA drivers built in.
Once booted: download the VirtIO driver ISO from the official Fedora project page (it’s the standard source for VirtIO Windows drivers). Attach it to the VM as a CD drive. Open Device Manager, find any unrecognized devices, and point them to the ISO.
Once drivers are installed, shut down the VM, switch the disk bus back to VirtIO SCSI, and boot again. It should work perfectly now — and it will be noticeably faster.
7.3 Install QEMU Guest Agent
The QEMU guest agent is a small service running inside the VM that lets Proxmox communicate with it properly. Without it, Proxmox can’t see the VM’s IP address, can’t do clean shutdowns, and can’t take consistent filesystem snapshots.
On Linux:
apt install qemu-guest-agent

systemctl enable --now qemu-guest-agent
On Windows: Mount the VirtIO ISO, run the guest-agent installer from the guest-agent folder.
Then enable it in Proxmox: VM → Options → QEMU Guest Agent → Enabled: Yes
7.4 Uninstall VMware Tools
If your VM had VMware Tools installed (and most do), uninstall them. They serve no purpose in a KVM environment and can sometimes cause network or timing issues.
Linux: apt remove open-vm-tools or yum remove open-vm-tools
Windows: Control Panel → Programs → Uninstall VMware Tools
While you’re in there: check your network interface names. Linux VMs frequently get renamed after migration (e.g., from ens192 to ens18). Update /etc/network/interfaces or your netplan config if static IPs stop working.
7.5 Consider ZFS for Storage
💡 If you haven’t already, setting up a ZFS pool for your VM storage gives you instant copy-on-write snapshots, built-in checksumming against bit rot, and compression. It’s one of Proxmox’s biggest advantages over a stock ESXi setup.
8. Troubleshooting: When Things Don’t Go As Planned
Even well-prepared migrations hit snags. Here are the most common issues and exactly how to resolve them:
| Problem | Cause | Fix |
| Windows VM blue screens on boot | Missing VirtIO storage driver | Temporarily set disk to IDE/SATA, boot, mount virtio-win.iso, install drivers, then switch to VirtIO SCSI |
| Import is extremely slow | VM has active snapshots | Delete all snapshots from ESXi BEFORE exporting — they chain and multiply transfer size |
| Network missing after migration | NIC renamed (e.g. ens192 → ens18) | Edit /etc/network/interfaces or netplan config with new interface name |
| Encrypted disk won’t import | VMware storage policy encryption enabled | Remove encryption policy in vSphere first, then re-export |
| vSAN-backed disk import fails | vSAN not supported as direct source | Storage vMotion the disk to a regular VMFS datastore, then export |
| VM boots but no display/console | BIOS vs UEFI mismatch | Match firmware type (SeaBIOS vs OVMF) to what the original VM used |
9. The Numbers Don’t Lie: A Real Cost Comparison
Let’s do the math on a realistic scenario: a small business or serious homelab with two physical servers, each with 8 cores (16 cores total).
VMware in 2026
- Minimum cores billed: 72 (regardless of your actual core count)
- VMware vSphere Standard pricing: ~$200–350 per core per year
- Minimum annual cost: 72 × $200 = $14,400 — and that’s the cheapest tier
- For VCF (the tier with HA clustering): 72 × $400+ = $28,800+ per year
- Add the 20% late renewal penalty if you miss the date: another $2,880–$5,760
Proxmox VE in 2026
- Community Edition: $0/year. Full features, no core limits, no expiry.
- Enterprise subscription (optional): ~€110/year per node = €220/year for two nodes. This gives you access to the stable enterprise repo and commercial support.
- What you lose on the free tier: Access to the enterprise update repository. The community repo still works fine for most use cases.
Bottom line: A two-node Proxmox cluster costs between €0 and €220/year. The equivalent VMware setup costs between $14,400 and $28,800+/year. That difference funds a lot of hardware upgrades.
10. Final Thoughts: The Migration Is Worth It
I want to be direct with you: this migration isn’t always painless. There are Windows VMs that throw a fit. There are edge cases that require extra research. There are an hour or two of troubleshooting in your future.
But here’s the thing — you do it once. You spend a weekend migrating, you learn the Proxmox platform, you come out the other side with a faster, more flexible, open-source infrastructure that nobody can suddenly charge you $25,000/year for.
The VMware of 2019 was genuinely great software with a reasonable pricing model. The VMware of 2026 is a licensing trap. And the exit ramp — Proxmox VE — is better than most people realize until they actually use it.
If this guide helped you, share it with someone still paying the VMware tax. And if you hit a specific issue during your migration that isn’t covered here, drop it in the comments — I read every single one.
“The best time to migrate from VMware was before the Broadcom acquisition. The second best time is right now.”
Mohammad Dahamshi is a skilled Embedded Software Engineer and web developer. With experience in C/C++, Linux, WordPress, and DevOps tools, he helps businesses solve technical challenges and build reliable digital solutions. Fluent in Arabic, Hebrew, and English, he also runs Saratec, offering web design and digital marketing services.