
At Techlino, we’re always looking for efficient ways to orchestrate self-hosted infrastructure. In this post, I’ll walk you through how we set up a full K3s cluster across multiple virtual machines on Proxmox, using clean hostnames like m.l, w1.l, w2.l, and w3.l — all running on ubuntu 24.04 based VMs.
Architecture Overview
We created a small cluster with:
- 1 Master Node:
m.l - 3 Worker Nodes:
w1.l,w2.l,w3.l
Each of these VMs is managed on a single Proxmox server, and all communicate internally over a local network (pi.hole made it easy for local DNS !). We used K3s for its simplicity and minimal resource footprint.
Step 1: Provisioning the VMs
First, we must create a base VM:
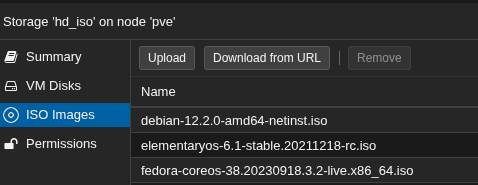
Lets download a cloudimg from ubuntu ubuntu cloudimg, just copy the link of the image and paste it in proxmox iso images tab :
Don’t forget to change your_secure_password with a strong one 🙂
We assume you downloaded ubuntu-22.04-server-cloudimg-amd64.img and you are in the directory where it has been downloaded.
Please pay attention to line 10, which is commented, if you have a personal DNS server, update it accordingly.
qm create 9000 --name ubuntu-22.04-cloudinit --memory 2048 --cores 2 --net0 virtio,bridge=vmbr0
qm importdisk 9000 ubuntu-22.04-server-cloudimg-amd64.img local-lvm
qm set 9000 --scsihw virtio-scsi-pci --scsi0 local-lvm:vm-9000-disk-0
qm set 9000 --ide2 local-lvm:cloudinit
qm set 9000 --boot c --bootdisk scsi0
qm set 9000 --serial0 socket --vga serial0

qm set 9000 --ciuser ubuntu --cipassword your_secure_password
qm set 9000 --ipconfig0 ip=dhcp,gw=192.168.1.1
#qm set 9000 --nameserver <your dns server ip>  # in case you have personal dns server
Using Proxmox and cloud-init, we spun up 4 VMs quickly. Each VM was given a fixed hostname and internal IP:
| Hostname | Role | IP Address |
| m.l | Master | 192.168.1.9 |
| w1.l | Agent | 192.168.1.10 |
| w2.l | Agent | 192.168.1.11 |
| w3.l | Agent | 192.168.1.12 |
You can use the following script, or change it as you like:
#!/bin/bash

BASE_VM=9000
BRIDGE=vmbr0
SSH_KEY_PATH=~/.ssh/id_rsa.pub  # Change this if needed

# Make sure the SSH key file exists
if [ ! -f "$SSH_KEY_PATH" ]; then
  echo "❌ SSH key file not found: $SSH_KEY_PATH"
  exit 1
fi

declare -A VMS=(
  [105]="k3s-master 4096 2 192.168.1.9"
  [106]="k3s-worker-1 2048 2 192.168.1.10"
  [107]="k3s-worker-2 2048 2 192.168.1.11"
  [108]="k3s-worker-3 2048 2 192.168.1.12"
)

for VMID in "${!VMS[@]}"; do
  IFS=' ' read -r NAME MEM CPU IP <<< "${VMS[$VMID]}"
  echo "🚀 Cloning VMID $VMID - $NAME"

  # Clone from base VM template
  qm clone $BASE_VM $VMID --name $NAME

  # Resize disk to 32G
  qm resize $VMID scsi0 32G

  # Set CPU and Memory
  qm set $VMID --memory $MEM --cores $CPU

  # Configure network device
  qm set $VMID --net0 virtio,bridge=$BRIDGE

  # Set cloud-init user, IP config, and SSH key
  qm set $VMID \
    --ciuser ubuntu \
    --ipconfig0 ip=$IP/24,gw=192.168.1.1 \
    --sshkeys "$SSH_KEY_PATH"

  # Start the VM
  qm start $VMID

  echo "✅ VM $NAME ($VMID) started with IP $IP and SSH access"
done🌐 Step 2: Local DNS with Hostnames
Instead of dealing with raw IPs, we created a clean DNS mapping:
- Using Pi-hole or
/etc/hosts, we mappedm.lto the master node’s IP. - All agents were able to resolve
m.lcorrectly for API access.
echo "192.168.1.9 m.l" | sudo tee -a /etc/hosts
Alternatively, if you run local DNS (e.g. via Pi-hole), just add a custom A record.
⚙️ Step 3: Installing K3s on the Master (m.l)
On the master node:
curl -sfL https://get.k3s.io | sh -
We then grabbed the join token from:
cat /var/lib/rancher/k3s/server/node-token #YOUR_K3S_TOKEN
Step 4: Installing K3s Agents (w1.l, w2.l, w3.l)
On each worker, we installed the agent with the following:
curl -sfL https://get.k3s.io | K3S_URL=https://m.l:6443 K3S_TOKEN=YOUR_K3S_TOKEN sh -
Alternatively, you can use a small script to automate it:
Don’t forget to change YOUR_K3S_TOKEN.
#!/bin/bash

# Set the master IP and token (get this from your master node via: sudo cat /var/lib/rancher/k3s/server/node-token)
MASTER_IP=m.l
K3S_TOKEN="YOUR_K3S_TOKEN"

# List of worker node hostnames (assumed resolvable via Pi-hole or /etc/hosts)
WORKERS=("w1.l" "w2.l" "w3.l")

# Loop through each worker node and install k3s agent
for NODE in "${WORKERS[@]}"; do
  echo "-----> Installing k3s agent on $NODE"

  ssh ubuntu@$NODE <<EOF
curl -sfL https://get.k3s.io | K3S_URL=https://$MASTER_IP:6443 K3S_TOKEN=$K3S_TOKEN sh -
EOF

  echo "✅ Done with $NODE"
done
✅ We used the hostname
m.lfor the master instead of an IP address — as long as it’s resolvable, it works perfectly!
📡 Step 5: Verifying the Cluster
From the master, we checked:
kubectl get nodes
And saw all the nodes:
root@k3s-master:~# kubectl get nodes
NAME           STATUS   ROLES                  AGE   VERSION
k3s-master     Ready    control-plane,master   23m   v1.33.3+k3s1
k3s-worker-1   Ready    <none>                 15m   v1.33.3+k3s1
k3s-worker-2   Ready    <none>                 15m   v1.33.3+k3s1
k3s-worker-3 Ready <none> 14m v1.33.3+k3s1What’s Next?
With this base cluster ready, we’re going to:
- Add a dashboard (like Rancher, Lens, or K9s)
- Deploy test apps via
kubectland Helm - Explore lightweight GitOps workflows
- Test autoscaling, load balancing, and persistent storage on self-hosted K3s
💡 Why We Chose K3s
- ✅ Lightweight, no hassle
- ✅ Runs on VMs with as low as 1GB RAM
- ✅ Easy single-command install
- ✅ Perfect for home labs or production-like testing
If you’re experimenting with Kubernetes at home or on a small VPS, K3s + Proxmox + custom DNS is a powerful combination.
🧪 Have questions or want a full script to automate this setup? Write your comment below !

I’m a software engineer with roots in embedded systems and a growing focus on DevOps and self-hosted infrastructure. CKA certified, CCNA background, and a homelab that never sleeps — running Proxmox, Kubernetes, Docker, Coolify, and more. On techlino.net I share practical guides on Linux, virtualization, and infrastructure built from real experience.